Search this blog ...

Wednesday, December 29, 2010

Additional Batch PDFill AutoIt Scripts

Merge all JPG image files in the source directory to a single PDF file in the output directory:

; Script by Matt Shannon - Dec 2010

$srcDirectory = 'C:\Documents and Settings\Administrator\Desktop\source'
$destDirectory = 'C:\Documents and Settings\Administrator\Desktop\output'

; change current directory to src directory
FileChangeDir($srcDirectory)
$search = FileFindFirstFile("*.jpg") 

If $search = -1 Then
  MsgBox(0, "Error", "No files/directories matched the search pattern")
  Exit
EndIf

RunPDFill()

$dest = ''

While 1
  $file = FileFindNextFile($search)
  If @error Then ExitLoop
  ; MsgBox(4096, "File:", $file)

  $dest = StringReplace($file, ".jpg", -1, 0) & ".pdf"

  AddImg($srcDirectory, $file)
 
WEnd

; Close the search handle
FileClose($search)

SaveToPDF($destDirectory, $dest)


Func RunPDFill()

  Run('C:\Program Files\PlotSoft\PDFill\PDFill_PDF_Tools.exe', "", @SW_MAXIMIZE)
  WinWaitActive("[REGEXPTITLE:PDFill PDF Tools 7.0.*]")

  ControlClick("[REGEXPTITLE:PDFill PDF Tools 7.0.*]", "", "[CLASS:Button; TEXT: 9. Convert Images to PDF]")
  WinWaitActive("[TITLE:Free PDF Tools: Convert images to PDF]")

  ; set paper size output to A4
  ControlClick("[TITLE:Free PDF Tools: Convert images to PDF]", "", "[CLASS:ComboBox; INSTANCE:1]")
  Send("A{ENTER}")

  ; set margins to 0
  ControlClick("[TITLE:Free PDF Tools: Convert images to PDF]", "", "[CLASS:Edit; INSTANCE:3]")
  Send("{HOME}{SHIFTDOWN}{END}{SHIFTUP}{DEL}0")

  ControlClick("[TITLE:Free PDF Tools: Convert images to PDF]", "", "[CLASS:Edit; INSTANCE:4]")
  Send("{HOME}{SHIFTDOWN}{END}{SHIFTUP}{DEL}0")

  ControlClick("[TITLE:Free PDF Tools: Convert images to PDF]", "", "[CLASS:Edit; INSTANCE:5]")
  Send("{HOME}{SHIFTDOWN}{END}{SHIFTUP}{DEL}0")

  ControlClick("[TITLE:Free PDF Tools: Convert images to PDF]", "", "[CLASS:Edit; INSTANCE:6]")
  Send("{HOME}{SHIFTDOWN}{END}{SHIFTUP}{DEL}0")

EndFunc


Func AddImg($srcdir, $srcfile)

  ; add an image
  ControlClick("[TITLE:Free PDF Tools: Convert images to PDF]", "", "[CLASS:Button; TEXT:Add an Image]")
  WinWaitActive("[TITLE:Select Image files to add into PDF]")

  ; send image location followed by enter
  ControlClick("[TITLE:Select Image files to add into PDF]", "", "[CLASS:Edit; INSTANCE:1]")
  Send($srcdir & "\" & $srcfile & "{ENTER}")

  ; wait for window to return
  WinWaitActive("[TITLE:Free PDF Tools: Convert images to PDF]")

EndFunc

Func SaveToPDF($destdir, $destfile)

  ; click save-as
  ControlClick("[TITLE:Free PDF Tools: Convert images to PDF]", "", "[CLASS:Button; TEXT:Save As ...]")
  WinWaitActive("[TITLE:Save all the images as ... ]")

  ; send pdf output location followed by enter
  ControlClick("[TITLE:Save all the images as ... ]", "", "[CLASS:Edit; INSTANCE:1]")
  Send($destdir & "\" & $destfile & "{ENTER}")

  ; wait for adobe to open - and then close it down
  WinWaitActive("[TITLE:" & $destfile & " - Adobe Reader]")
  WinClose("[TITLE:" & $destfile & " - Adobe Reader]")

  ; wait for pdf image tools to return - and then close it down
  WinWaitActive("[TITLE:Free PDF Tools: Convert images to PDF]")
  WinClose("[TITLE:Free PDF Tools: Convert images to PDF]")

  ; wait for main pdf tools to return - and then close it down
  WinWaitActive("[REGEXPTITLE:PDFill PDF Tools 7.0.*]")
  WinClose("[REGEXPTITLE:PDFill PDF Tools 7.0.*]")

EndFunc


Merge all PDF files in the source directory to a single PDF file in the output directory:

; Script by Matt Shannon - Dec 2010

$srcDirectory = 'C:\Documents and Settings\Administrator\Desktop\source'
$destDirectory = 'C:\Documents and Settings\Administrator\Desktop\output'

; change current directory to src directory
FileChangeDir($srcDirectory)
$search = FileFindFirstFile("*.pdf") 

If $search = -1 Then
  MsgBox(0, "Error", "No files/directories matched the search pattern")
  Exit
EndIf

RunPDFill()

$dest = ''

While 1
  $file = FileFindNextFile($search)
  If @error Then ExitLoop
  ; MsgBox(4096, "File:", $file)

  $dest = StringReplace($file, ".pdf", -1, 0) & "_merged.pdf"

  AddPdf($srcDirectory, $file)
 
WEnd

; Close the search handle
FileClose($search)

SaveToPDF($destDirectory, $dest)


Func RunPDFill()

  Run('C:\Program Files\PlotSoft\PDFill\PDFill_PDF_Tools.exe', "", @SW_MAXIMIZE)
  WinWaitActive("[REGEXPTITLE:PDFill PDF Tools 7.0.*]")

  ControlClick("[REGEXPTITLE:PDFill PDF Tools 7.0.*]", "", "[CLASS:Button; TEXT: 1. Merge PDF Files]")
  WinWaitActive("[TITLE:Free PDF Tools: Merge PDF Files]")

EndFunc


Func AddPdf($srcdir, $srcfile)

  ; Add a PDF File
  ControlClick("[TITLE:Free PDF Tools: Merge PDF Files]", "", "[CLASS:Button; TEXT:Add a PDF File]")
  WinWaitActive("[TITLE:Add PDF files to be Concated]")

  ; send image location followed by enter
  ControlClick("[TITLE:Add PDF files to be Concated]", "", "[CLASS:Edit; INSTANCE:1]")
  Send($srcdir & "\" & $srcfile & "{ENTER}")

  ; wait for window to return
  WinWaitActive("[TITLE:Free PDF Tools: Merge PDF Files]")

EndFunc

Func SaveToPDF($destdir, $destfile)

  ; click save-as
  ControlClick("[TITLE:Free PDF Tools: Merge PDF Files]", "", "[CLASS:Button; TEXT:Save As ...]")
  WinWaitActive("[TITLE:Save the concated file as ... ]")

  ; send pdf output location followed by enter
  ControlClick("[TITLE:Save the concated file as ... ]", "", "[CLASS:Edit; INSTANCE:1]")
  Send($destdir & "\" & $destfile & "{ENTER}")

  ; wait for adobe to open - and then close it down
  WinWaitActive("[TITLE:" & $destfile & " - Adobe Reader]")
  WinClose("[TITLE:" & $destfile & " - Adobe Reader]")

  ; wait for pdf image tools to return - and then close it down
  WinWaitActive("[TITLE:Free PDF Tools: Merge PDF Files]")
  WinClose("[TITLE:Free PDF Tools: Merge PDF Files]")

  ; wait for main pdf tools to return - and then close it down
  WinWaitActive("[REGEXPTITLE:PDFill PDF Tools 7.0.*]")
  WinClose("[REGEXPTITLE:PDFill PDF Tools 7.0.*]")

EndFunc

Friday, December 24, 2010

Batch Convert Images to PDF using PDFill and AutoIt

I’m in the processing of completely digitalizing my filing cabinet and shredding all but the most important paper-based records. I recently purchased a Canon PIXMA MX870 Multifunction printer/scanner unit purely for its Auto Document Feeder with duplex scanning support. It turns out, the ADF duplex support isn’t all I had hoped with it regularly complaining about paper jams.  This really irritates me Canon! I’m furious actually.

Anyway back to the digital filing cabinet …

I’m leveraging three really cool pieces of software:

  1. FileCenter by Lucion http://lucion.com/filecenter-overview.html
  2. PDFill PDF tools (FREE) by PlotSoft  http://www.pdfill.com/pdf_tools_free.html
  3. AutoIt  http://www.autoitscript.com/autoit3

FileCenter is providing the interface to my new digital filing cabinet providing file management capabilities along with scanning and OCR (optical character recognition) features. It has a number of really useful bells and whistles including smart file (re)naming capabilities that really help with the overall organization of the filing cabinet. The standard edition which I initially purchased (on special now for $50) seems to do its job quite well.  The only downside is the supplied OCR engine is sometimes not up to the task. The FileCenter Pro Plus edition (on special now for $199) ships with an Advanced OCR engine that seems to have a much better job at extracting text from the various scans/images I supply it. I may persist with Standard Edition for a little longer as money is tight – but if Lucion want to give me a free upgrade please contact me :). Lucion provides a 30 day trial of FileCenter Pro Plus with no limitations whatsoever – so check it out. It’s a great piece of software.

PDFill PDF tools are FREE and are without doubt some of the most useful and powerful tools I have ever come across. I use these tools regularly to do things like:

  • Merging PDF files together
  • Reordering pages of PDF files
  • Converting images to PDF
  • Rotating PDF pages

Whilst FileCenter appears to provide many of these capabilities, the level of customization and tweaking that the PDFill PDF tools provide is unmatched. The only downside to these tools is they are all GUI based requiring lots of clicks and user input and don’t appear to provide any command-line based control for doing tasks like batch conversion/processing.

This is where the final piece of software “AutoIt v3” comes in to its own. The guys that wrote this are studs to release it for free.  This tool/scripting language allows one to construct little batch file/shell script like programs that can automatically control and interact with Windows applications without any end-user input required. Thus, I can write a little program for example that simulates mouse clicks and keyboard input from a user.

I have a number a JPG image files that are essentially scans of various paper-based documents that I want to convert to PDF. PDFill provides a tool "Convert Images to PDF" that allows me to manually navigate to the appropriate source image, and then specify the output PDF file along with the PDF output page size / margins / image layout etc etc. This is quite a laborious repetitive task that I decided to automate by using an AutoIT v3 script.

The script essentially searches for JPG files in a particular source directory, then iterates through each image file returned supplying it automatically to the PDFill tool. Appropriate output options / output file etc get set using a combination of automated mouse gestures and keyboard input. Upon conversion completion, the script detects Adobe Reader automatically launching to preview the output and closes it down.

Without further adieu – I give you the automated batched PDFill conversion script :-

; Script by Matt Shannon - Dec 2010

$srcDirectory = 'C:\Documents and Settings\Administrator\Desktop\scans'
$destDirectory = 'C:\Documents and Settings\Administrator\Desktop\output'

; change current directory to src directory
FileChangeDir($srcDirectory)
$search = FileFindFirstFile("*.jpg") 

If $search = -1 Then
  MsgBox(0, "Error", "No files/directories matched the search pattern")
  Exit
EndIf

While 1
  $file = FileFindNextFile($search)
  If @error Then ExitLoop
  ; MsgBox(4096, "File:", $file)

  $dest = StringReplace($file, ".jpg", -1, 0) & ".pdf"

  ConvertToPDF($srcDirectory, $file, $destDirectory, $dest)
 
WEnd

; Close the search handle
FileClose($search)

Func ConvertToPDF($srcdir, $srcfile, $destdir, $destfile)

  Run('C:\Program Files\PlotSoft\PDFill\PDFill_PDF_Tools.exe', "", @SW_MAXIMIZE)
  WinWaitActive("[REGEXPTITLE:PDFill PDF Tools 7.0.*]")

  ControlClick("[REGEXPTITLE:PDFill PDF Tools 7.0.*]", "", "[CLASS:Button; TEXT: 9. Convert Images to PDF]")
  WinWaitActive("[TITLE:Free PDF Tools: Convert images to PDF]")

  ; set paper size output to A4
  ControlClick("[TITLE:Free PDF Tools: Convert images to PDF]", "", "[CLASS:ComboBox; INSTANCE:1]")
  Send("A{ENTER}")

  ; set margins to 0
  ControlClick("[TITLE:Free PDF Tools: Convert images to PDF]", "", "[CLASS:Edit; INSTANCE:3]")
  Send("{HOME}{SHIFTDOWN}{END}{SHIFTUP}{DEL}0")

  ControlClick("[TITLE:Free PDF Tools: Convert images to PDF]", "", "[CLASS:Edit; INSTANCE:4]")
  Send("{HOME}{SHIFTDOWN}{END}{SHIFTUP}{DEL}0")

  ControlClick("[TITLE:Free PDF Tools: Convert images to PDF]", "", "[CLASS:Edit; INSTANCE:5]")
  Send("{HOME}{SHIFTDOWN}{END}{SHIFTUP}{DEL}0")

  ControlClick("[TITLE:Free PDF Tools: Convert images to PDF]", "", "[CLASS:Edit; INSTANCE:6]")
  Send("{HOME}{SHIFTDOWN}{END}{SHIFTUP}{DEL}0")

  ; add an image
  ControlClick("[TITLE:Free PDF Tools: Convert images to PDF]", "", "[CLASS:Button; TEXT:Add an Image]")
  WinWaitActive("[TITLE:Select Image files to add into PDF]")

  ; send image location followed by enter
  ControlClick("[TITLE:Select Image files to add into PDF]", "", "[CLASS:Edit; INSTANCE:1]")
  Send($srcdir & "\" & $srcfile & "{ENTER}")

  ; wait for window to return
  WinWaitActive("[TITLE:Free PDF Tools: Convert images to PDF]")

  ; click save-as
  ControlClick("[TITLE:Free PDF Tools: Convert images to PDF]", "", "[CLASS:Button; TEXT:Save As ...]")
  WinWaitActive("[TITLE:Save all the images as ... ]")

  ; send pdf output location followed by enter
  ControlClick("[TITLE:Save all the images as ... ]", "", "[CLASS:Edit; INSTANCE:1]")
  Send($destdir & "\" & $destfile & "{ENTER}")

  ; wait for adobe to open - and then close it down
  WinWaitActive("[TITLE:" & $destfile & " - Adobe Reader]")
  WinClose("[TITLE:" & $destfile & " - Adobe Reader]")

  ; wait for pdf image tools to return - and then close it down
  WinWaitActive("[TITLE:Free PDF Tools: Convert images to PDF]")
  WinClose("[TITLE:Free PDF Tools: Convert images to PDF]")

  ; wait for main pdf tools to return - and then close it down
  WinWaitActive("[REGEXPTITLE:PDFill PDF Tools 7.0.*]")
  WinClose("[REGEXPTITLE:PDFill PDF Tools 7.0.*]")

EndFunc

Friday, November 26, 2010

I repaired my Lelit Combi PL042QE coffee machine

Today I finally got some free time to look at the Lelit coffee machine. It had stopped working a few weeks back with a complete loss of power. At the time, I remember thinking the machine was extremely hot and suspected the worse.  None of the lights on the front (power etc) would subsequently activate and I was expecting some costly repairs. I sent an email to Alan Frew from coffeeco where the machine was originally purchased (I’m the second owner).  Alan quickly responded with a useful link to his website for steps on troubleshooting:

http://www.coffeeco.com.au/articles/repair.html

Unfortunately, according to Alan’s flow chart “When I turn it on nothing happens” indicates “Your problem is serious. Return your machine for expert service”. 

Anyway, I decided to pull the machine apart (which ultimately takes the removal of just 2 screws), to see if I could spot something visually that could indicate the cause.

Nothing!

Next, I did a search on google for multimeter and Lelit coffee machine to see if someone much smarter than I had done similar troubleshooting in the past.

Nothing!

I finally stumbled on an excellent guide for troubleshooting Rancilio Silvia machines http://www.coffeegeek.com/forums/espresso/machines/312139 which gave me a basis to get started.

BEFORE CONTINUING – ENSURE THE MACHINE IS COMPLETELY DISCONNECTED FROM THE POWER SOURCE

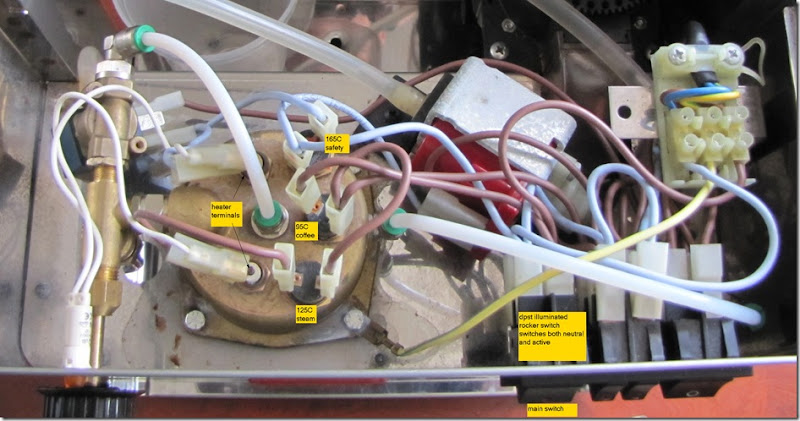
The Lelit that I’m in possession of is fitted with three thermostats:

  1. 95°C thermostat for coffee
  2. 125°C thermostat for steam
  3. 165°C thermostat for safety over-temperature cut-off (red push button)

I first set my cheap $20 DickSmith multimeter to test for continuity. I set test leads on each side of the thermostat (having removed the active (brown)/netural (blue) cables). The buzzer sounded on each thermostat (which for my multimeter indicates the resistance is less than 70Ω). Pulling the little red push button upwards on the 165°C thermostat causes the buzzer to stop indicating an open circuit (which is expected).

Just to be doubly sure that the thermostats appeared to be good (and not measuring more than a few ohms), I set the multimeter to measure resistance.  There is a note in the manual of my multimeter stating to short-circuit the test leads/input terminals before taking measurements where low-resistance precise measurement is required and record the resulting value. The value should then be subtracted from the measurement obtained when testing the particular object in question. Taking the above adjustment in to account, the resistance readings for the 95, 125, and 165 thermostats were 0.1, 0.1, and 1.x ohms respectively – all well within the “few” ohms range. The fact that the 165 thermostat was reading slightly higher had me wondering whether it was possibly bad??

IMG_0163

Next, the Silvia troubleshooting article states to test the heating coil (element) by obtaining a resistance reading across the heater terminals. Once again we remove the connecting cables and perform our test against the bare terminals. The resistance reading across the heater terminals on my machine was 50Ω . Fantastic!!! It thus looks like I hadn’t burned my element out!

At this stage, I decided to give Alan a call suspecting that maybe it was the 165 thermostat that could be the issue.  I provided him the resistance readings from the thermostat and heater, and Alan seemed to think they were fine. He mentioned a few additional troubleshooting steps that I could perform, and also told me a story of how a customer the day before had brought in to the shop a $2000  coffee machine for servicing that had just stopped working. The machine that had died turned out just to have a faulty main power switch.  A faulty power switch I thought – surely that couldn’t be my issue - switches don’t just break. 

Anyway I persisted with my charge that it must be the thermostat and decided to find out if there was a simple way to bypass it to see if the machine would momentarily turn on (to prove the thermostat was the issue!).  It turns out it is as simple as (carefully) just shorting the thermostat’s two terminals with a wire to keep the circuit closed.

I gingerly shorted the two terminals of the thermostat and carefully plugged the machine in to the power source and pushed the main switch.  NOTE – my place is fitted with a residual current device (RDC) – also known as a safety switch.  I would not have attempted this without such a backup.

Nothing!  No lights.  Still broken.

BEFORE CONTINUING – ENSURE THE MACHINE IS COMPLETELY DISCONNECTED FROM THE POWER SOURCE

At this point with nothing to lose and facing the thought of packaging my machine up and getting it serviced by the professionals, I decided to test if the main switch could be the fault.  The switch fitted to the machine is a DPST (double pole, single throw) – meaning two separate circuits are controlled by the switch, and the switch can either be closed (on), or open (off).

I set the multimeter back to continuity and inserted each lead in to the terminals controlling the active circuit (brown wires). The buzzer sounded as I flicked the switch from off to on. So this particular circuit was intact. I next inserted the leads in to the terminals controlling the neutral circuit(blue wires). This time, the buzzer would NOT sound as I repeatedly flicked the switch from on to off (and vice-versa).  Wow – the switch was broken!  Who would have thought?  Maybe Alan had intentionally mentioned this switch thing for a reason (in fact I bet he did!!!).

I decided to set the switch to the on position and remove the neutral connecting leads and manually short them together carefully using a wire. I once again plugged the machine in to the power source. 

LIGHTS – ACTION.

The boiler light came on and a bit of excess water spat out the tubes. It worked!  I quickly disconnected the power source.

BEFORE CONTINUING – ENSURE THE MACHINE IS COMPLETELY DISCONNECTED FROM THE POWER SOURCE

OK – so the broken switch was the reason the machine would not power up. But what had caused the switch to break in the first place? The switch is easily removed by pushing the spring-like clips on the top/bottom of the switch whilst at the same time pushing from the rear so that it pops out the front of the machine. On inspection of the switch terminals, I could see the lower terminal that accepts the incoming neutral (blue) cable from the power source was slightly melted. Why this was, I do not know. The machine had been left on for quite a considerable time (90 minutes or so) without any use. I’ll have to wait and see if the issue reproduces – and if so, get the experts involved.

The rocker switch itself is rated for 16A/250V AC and T120/55 (ambient temperature). Tracking down a replacement DPST switch in Australia with similar specs was proving reasonably tricky.

I found the following rocker switch SCHURTER 1301.9224  (red illumination) that matched the specs perfectly. The green illumination model is 1301.9215.  Farnell (aka element14) sell both switches for about $5 each – but there is a minimum credit card order of $10 required and a 5 day wait. http://au.element14.com

Jaycar also sells a similar switch – although it is a DPDT! http://jaycar.com.au/productView.asp?ID=SK0982

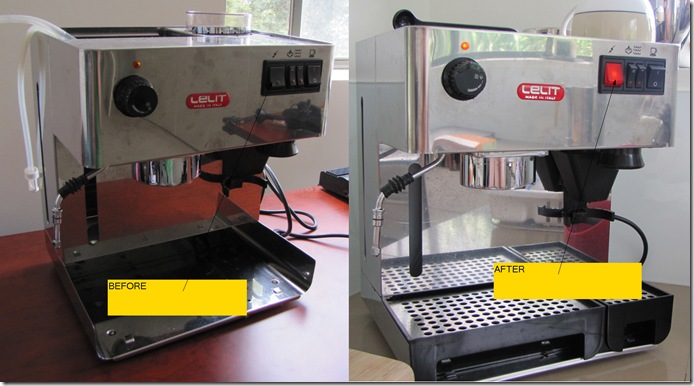
Eager to get my coffee machine back in order, I decided to buy switches from both places.I picked the switch up from Jaycar and installed it, and everything appears to work perfectly. I have also ordered the Schurter 1301.9224 from element14, and if motivated will probably switch the Jaycar out and replace it.

Below is a pic of before and after:

beforeafter

A big thankyou to both Alan Frew from coffeeco, and also Jim Galt (author of troubleshooting Rancilio Silvia post).

Tuesday, November 16, 2010

Example cost of running a Tivo

Tivo apparently draws 24W continuously.

Origin energy here in QLD have a standard tariff of 21.351 cents/kWH

365 days per year * 24 hours per day * .024 KW * .21351 $/kWH (Origin Energy) = $44.88 per year to run.

Wednesday, October 6, 2010

Big Day Out Gold Coast 2011 Direct Ticket Link

Tonight at midnight, the following link should become active:

https://shopping.bdotickets.com.au/bdo2011/venue_goldcoast.php

I suggest using the above link directly, rather than going to the bigdayout.com website (as it will be getting hammered)

bdo

Friday, September 24, 2010

IP Subnetting Manual Calculation

Here is a nifty online subnetting calculator http://www.subnet-calculator.com/

And here is an excellent doc that describes how the calculation is made http://www.cisco.com/en/US/tech/tk365/technologies_tech_note09186a00800a67f5.shtml

Below are some manual calculations that I performed:

The machines has an ip address 10.228.137.4, with assigned subnet mask 255.255.248.0

This IP addresses falls in the Network Class A range (1.0.0.0 - 127.255.255.255)

Thus, it has a standard network mask of 255.0.0.0

Representing 255.255.248.0 in binary :-

(n = standard network mask)

(s = subnet bits claimed)

(h = available host bits)

n   n   n   n   n   n   n   n     s   s   s   s   s   s   s   s     s   s   s   s   s   h   h   h     h   h   h   h   h   h   h   h
128 064 032 016 008 004 002 001   128 064 032 016 008 004 002 001   128 064 032 016 008 004 002 001   128 064 032 016 008 004 002 001 

             255                               255                         128+64+32+16+8 = 248

meaning 13 bits (8 + 5) are now being repurposed for subnet bits
2^13 = 8192 maximum subnets

8 standard network mask bits + 13 repurposed bits = 21 mask bits in total.

11 bits (3 + 8) remain for hosts
2^11 = 2048 ;
subtract 1 for broadcast address; subtract 1 as host ids all 0 are now allowed; = 2046 hosts per subnet

# 21 mask bits activated, 11 bits remaining for host
n   n   n   n   n   n   n   n     s   s   s   s   s   s   s   s     s   s   s   s   s   h   h   h     h   h   h   h   h   h   h   h
128 064 032 016 008 004 002 001   128 064 032 016 008 004 002 001   128 064 032 016 008 004 002 001   128 064 032 016 008 004 002 001 

# representing 10.228.137.4 as binary
0   0   0   0   1   0   1   0     1   1   1   0   0   1   0   0     1   0   0   0   1   0   0   1     0   0   0   0   0   1   0   0

# leaving the host/subnet portion unchanged, zero out the host bits
0   0   0   0   1   0   1   0     1   1   1   0   0   1   0   0     1   0   0   0   1   0   0   0     0   0   0   0   0   0   0   0
# = 10.228.136.0

# leaving the host/subnet portion unchanged, replace host bits with all 1's
0   0   0   0   1   0   1   0     1   1   1   0   0   1   0   0     1   0   0   0   1   1   1   1     1   1   1   1   1   1   1   1
# = 10.228.143.255

thus current mask 255.255.248.0 using ip 10.228.137.4 falls is in the subnet with range 10.228.136.1 through 10.228.143.254

given we have 21 mask bits (8 standard network mask bits + 13 repurposed bits) .. we could write the above subnet as...

10.228.136.0/21

Tuesday, September 21, 2010

JDeveloper 11gR1 - integrated WebLogic Server and OWSM

Documented below are the steps/tips I have employed to get JDeveloper 11g1, embedded WebLogic Server, and WSM to play nicely (on Windows).

Tip 1 - Ensure the ‘User Home Directory’ is free of whitespace.

The user home directory contains the user's preferences for Oracle JDeveloper (in the system subdirectory).

On my XP machine, the user home directory for JDeveloper gets created under the %USERPROFILE% directory.  For example “C:\Documents and Settings\Administrator\Application Data\JDeveloper

The whitespace in the directory path above I have found out can be bad news and may lead to an error such as:

java.net.URISyntaxException: Illegal character in path at index 18: file:/C:/Documents and Settings/....

To determine existing value from within Oracle JDeveloper, go to the Help menu, select About, go to Properties tab, and view the value of ide.user.dir

There are a number of different ways to override the JDeveloper user home directory; I chose to leverage the JDEV_USER_HOME environment variable, and set it to “C:\JDeveloper

You can explicitly set the home environment variable by adding the following line in the <Middleware Home>\jdeveloper\jdev\bin/jdev.boot file:
ide.user.dir = <Path to preferred user directory>

The user home directory can also be specified from the command line using this command:
jdev.exe -J-Dide.user.dir=<Path>

The home directory can also be set based on the value of an environment variable.

MW_HOME/jdeveloper/jdev/bin/jdev.boot contains an entry such as:
ide.user.dir.var = JDEV_USER_HOME, JDEV_USER_DIR

This is the default variable(s) that Oracle JDeveloper will look for at startup to determine the home directory.
You can define or add any environment variable that Oracle JDeveloper should use.

To set the value of an environment variable from Windows:

1. From Control Panel, select System, Select the Advanced tab, and then click Environment Variables.
3. In the User Variables section, click New.
4. Add JDEV_USER_HOME, or the name you chose for ide.user.dir.var, as a user variable.
5. Set the value of this variable to your home directory (for example, N:\users\jdoe), and click OK.

Tip 2 – Embedded / Integrated WebLogic Server (Re)Creation

The first time a JEE project is run/debug from JDeveloper, the integrated WebLogic Server starts and provisions a domain named “DefaultDomain”.

You can find it under the JDeveloper user home directory in the systemXXXXXX folder; for example:

C:\JDeveloper\system11.1.1.3.37.56.60\DefaultDomain

If you ever mess things up,  or want to start from fresh (reverting any changes you may have performed– including users / groups / credential store settings / deployments etc), you just just remove the DefaultDomain directory.  

1. Shutdown your IntegratedWeblogicServer (if running) and exit JDeveloper
2. Delete the systemXXXXXX/DefaultDomain directory

The next time you run a JEE application, JDeveloper will recreate a fresh DefaultDomain for you.

Alternatively, rather than waiting for a JEE application to get run, you can get JDeveloper to create the default domain straight up.
1. From the View menu, choose ApplicationServerNavigator
2. Right click on Application Servers / IntegratedWeblogicServer, select "Create Default Domain..."

The Integrated WebLogic server domain in JDeveloper is by default configured with:

adrs_template
jsf_template
jrf_template
adf_logging_fine
oracle.ucm.ridc_template
wsmpm-config-template
wsmpm-template
oracle.wc_adrs_template_11.1.1

Tip 3 – Credential Store and Keystore configuration in DefaultDomain of integrated WebLogic Server

Note, DOMAIN_HOME below refers to %JDEV_USER_HOME%\system11.1.1.3.37.56.60\DefaultDomain

The file %DOMAIN_HOME%\config\fmwconfig\jps-config.xml contains the various service provider types and actual instance/implementations of these configured for the domain.

    <serviceProviders>
        <serviceProvider type="CREDENTIAL_STORE" name="credstoressp" class="oracle.security.jps.internal.credstore.ssp.SspCredentialStoreProvider">
            <description>SecretStore-based CSF Provider</description>
        </serviceProvider>

        <serviceProvider type="KEY_STORE" name="keystore.provider" class="oracle.security.jps.internal.keystore.KeyStoreProvider">
            <description>PKI Based Keystore Provider</description>
            <property name="provider.property.name" value="owsm"/>
        </serviceProvider>

    </serviceProviders>

    <serviceInstances>
        <!-- JPS Credential Store Service Instance -->
        <serviceInstance name="credstore" provider="credstoressp" location="./">
            <description>File Based Credential Store Service Instance</description>
        </serviceInstance>

        <!-- KeyStore Service Instance -->
        <serviceInstance name="keystore" provider="keystore.provider" location="./default-keystore.jks">
            <description>Default JPS Keystore Service</description>
            <property name="keystore.type" value="JKS"/>
         <property name="keystore.csf.map" value="oracle.wsm.security"/>
            <property name="keystore.pass.csf.key" value="keystore-csf-key"/>
            <property name="keystore.sig.csf.key" value="sign-csf-key"/>
            <property name="keystore.enc.csf.key" value="enc-csf-key"/>  
        </serviceInstance>

    </serviceInstances>

    <jpsContexts default="default">
        <!-- This is the default JPS context. All the mendatory services and Login Modules must be configured in this default context -->
        <jpsContext name="default">
            <serviceInstanceRef ref="credstore"/>
            <serviceInstanceRef ref="keystore"/>
            <serviceInstanceRef ref="policystore.xml"/>
            <serviceInstanceRef ref="audit"/>
            <serviceInstanceRef ref="idstore.ldap"/>
        </jpsContext>

    </jpsContexts>

The credential store instance referenced above, is a wallet-based credential store (also referred to as a file-based credential store), and will essentially be referring to a file named cwallet.sso in the same directory as the jps-config.xml file (%DOMAIN_HOME%\config\fmwconfig)

The keystore instance referenced above is a “JKS” file-based keystore, named default-keystore.jks , and found in the same directory as the jps-config.xml file (%DOMAIN_HOME%\config\fmwconfig)

When DefaultDomain in the integrated WebLogic server is provisioned, cwallet.sso is created, whereas default-keystore.jks is not created!!

You can leverage the orapki command to get a basic listing of the cwallet.sso contents:

C:\JDeveloper\system11.1.1.3.37.56.60\DefaultDomain\config\fmwconfig>

c:\Oracle\Middleware\oracle_common\bin\orapki wallet display -wallet cwallet.sso

Oracle PKI Tool : Version 11.1.1.2.0
Copyright (c) 2004, 2009, Oracle and/or its affiliates. All rights reserved.

Requested Certificates:
User Certificates:
Oracle Secret Store entries:
Trusted Certificates:
Subject:        OU=Class 1 Public Primary Certification Authority,O=VeriSign\, Inc.,C=US
Subject:        OU=Secure Server Certification Authority,O=RSA Data Security\, Inc.,C=US
Subject:        CN=Entrust.net Secure Server Certification Authority,OU=(c) 1999 Entrust.net Limited,OU=www.entrust.net/CPS incorp. by ref. (limits liab.),O=Entrust.net,C=US
Subject:        CN=GTE CyberTrust Global Root,OU=GTE CyberTrust Solutions\, Inc.,O=GTE Corporation,C=US
Subject:        OU=Class 3 Public Primary Certification Authority,O=VeriSign\, Inc.,C=US
Subject:        CN=Entrust.net Secure Server Certification Authority,OU=(c) 2000 Entrust.net Limited,OU=www.entrust.net/SSL_CPS incorp. by ref. (limits liab.),O=Entrust.net
Subject:        OU=Class 2 Public Primary Certification Authority,O=VeriSign\, Inc.,C=US
Subject:        CN=Entrust.net Certification Authority (2048),OU=(c) 1999 Entrust.net Limited,OU=www.entrust.net/CPS_2048 incorp. by ref. (limits liab.),O=Entrust.net
Tip 4 – Oracle WSM – SAML Policies (wss11_saml_token_with_message_protection_service_policy) / leveraging DefaultDomain of JDeveloper integrated WebLogic Server for testing

http://download.oracle.com/docs/cd/E14571_01/web.1111/b32511/setup_config.htm#BABJJBFF

Ultimately both the Web Service, and the Web Service client need their own private/public key pair.

Additionally, both client and service need to be able to verify each other's respective public certificate by traversing the certification path until a valid root CA certificate is obtained.

Note:
- the client sends its public key to the service as part of the request.
- the client must obtain the server's public certificate; It can either be published in the WSDL with latest 11g OWSM release ( http://download.oracle.com/docs/cd/E14571_01/web.1111/b32511/setup_config.htm#BABJCGBC ), or, manually added to client's keystore and referenced through recipient key alias (ClientConstants.WSS_RECIPIENT_KEY_ALIAS).
- with SAML Policy, we must use the RSA key mechanism, the SHA-1 algorithm, and AES-128 bit encryption to satisfy the policy requirements for the key.


Three Approaches for generating private/public key pair:

- Self-Signed Certificate (1)
- Signed using Oracle Demo Certificate Authority (2)
- Signed using traditional Certificate Authority (3) (such that, one whom is present in the JVM's cacerts [java keystore file])

1) A self-signed certificate is a certificate in which the "issuer" entity and actual "subject" entity are the same.
In other words, a seft-signed certificate is a certificate where the "issuer" signs his own public key with his private key.

2) Oracle Provides a Demo Certificate Authority (CertGenCA - also self-signed as all root CAs are)

$WL_HOME/server/lib/CertGenCA.der (public certificate)
$WL_HOME/server/lib/CertGenCAKey.der (private key)

keytool -printcert -file C:\Oracle\Middleware\wlserver_10.3\server\lib\CertGenCA.der

Owner: CN=CertGenCAB, OU=FOR TESTING ONLY, O=MyOrganization, L=MyTown, ST=MyState, C=US
Issuer: CN=CertGenCAB, OU=FOR TESTING ONLY, O=MyOrganization, L=MyTown, ST=MyState, C=US
Serial number: 234b5559d1fa0f3ff5c82bdfed032a87
Valid from: Fri Oct 25 01:54:45 EST 2002 until: Wed Oct 26 01:54:45 EST 2022
Certificate fingerprints:
         MD5:  A2:18:4C:E0:1C:AB:82:A7:65:86:86:03:D0:B3:D8:FE
         SHA1: F8:5D:49:A4:12:54:78:C7:BA:42:A7:14:3E:06:F5:1E:A0:D4:C6:59
         Signature algorithm name: MD5withRSA
         Version: 3
...

3) JDK 1.6 out of the box ships with support for most of the standard/traditional Certificate Authorities (similar to what you would find in the Browser - VeriSign etc).
The public certificate of the CAs can be found in the cacerts file.
Additionally, one can import their own CA in to the cacerts (keystore) file.

To view the list of CAs ...

%JAVA_HOME%\bin\keytool -list -keystore %JAVA_HOME%\jre\lib\security\cacerts -storepass "changeit" –v

Taking the following scenario:

1) Web Service deployed to an appropriate WebLogic server on some central Linux server
2) Testing a Web Service client app running from JDeveloper integrated WebLogic server on local Windows machine
3) Using the Oracle Demo Certificate Authority

the following steps would be required:


From Server Domain (where the Web Service is running)

1) source $DOMAIN_HOME/bin/setDomainEnv.sh

2) cd $DOMAIN_HOME/config/fmwconfig

3) Create service key-certificate pair signed by the demo CA cert "CertGenCA"

java utils.CertGen -certfile ServerPublicCertificate -keyfile ServerPrivateKey -keyfilepass welcome1 -cn "`hostname -f`"

4) Create service keystore with service key-certificate pair

java utils.ImportPrivateKey -keystore default-keystore.jks -storepass welcome1 -certfile ServerPublicCertificate.der -keyfile ServerPrivateKey.der -keyfilepass welcome1 -alias serverkey -keypass welcome1

5) Now add the root CA to the service keystore

keytool -importcert -file $WL_HOME/server/lib/CertGenCA.der -keystore default-keystore.jks -storepass welcome1

6) Add options to credential store (CWALLET.SSO) so as to access keys/certificates from keystore

$MW_HOME/Oracle_ECM1/common/bin/wlst.sh  (or $MW_HOME/oracle_common/common/bin/wlst.sh)

connect('weblogic','welcome1','t3://localhost:7001')
createCred(map="oracle.wsm.security", key="keystore-csf-key", user="n/a", password="welcome1")
createCred(map="oracle.wsm.security", key="sign-csf-key", user="serverkey", password="welcome1")
createCred(map="oracle.wsm.security", key="enc-csf-key", user="serverkey", password="welcome1")

Optional:
listCred(map="oracle.wsm.security", key="keystore-csf-key")
listCred(map="oracle.wsm.security", key="sign-csf-key")
listCred(map="oracle.wsm.security", key="enc-csf-key")

7) Restart

-------------------------------------------------------------------------------------------------------------------------------------

>From Client Domain - JDeveloper integrated WebLogic Server (where the client is running)

1) SET DOMAIN_HOME=%JDEV_USER_HOME%\system11.1.1.3.37.56.60\DefaultDomain

2) %DOMAIN_HOME%\bin\setDomainEnv.cmd

3) cd %DOMAIN_HOME%\config\fmwconfig

4) Create client key-certificate pair signed by the demo CA cert "CertGenCA"

java utils.CertGen -certfile ClientPublicCertificate -keyfile ClientPrivateKey -keyfilepass welcome1

Note
-cn is optional argument, which determines the common name to which the certificate is issued to.
If this argument is skipped, the certificate is issued in the name of the hostname of the machine from which the certificate is generated

5) Create client keystore with client key-certificate pair

java utils.ImportPrivateKey -keystore default-keystore.jks -storepass welcome1 -certfile ClientPublicCertificate.der -keyfile ClientPrivateKey.der -keyfilepass welcome1 -alias clientkey -keypass welcome1

6) Now add the root CA to the client keystore

keytool -importcert -file %WL_HOME%\server\lib\CertGenCA.der -keystore default-keystore.jks -storepass welcome1

7) Add the service's public certificate to the client keystore.
(You must copy the server public certificate across to client)

keytool -importcert -file ServerPublicCertificate.der -alias serverkey -keystore default-keystore.jks -storepass welcome1

(Note
Latest version of OWSM can expose public certificate of service directly in the service WSDL through its Service Identity Certificate Extension
http://download.oracle.com/docs/cd/E14571_01/web.1111/b32511/setup_config.htm#BABJCGBC
Hence, this step may not be required.
In older releases, the service's public certificate had to be added to the client keystore;
If the recipient alias property on the client was not explicitly set, then this certificate would need to have been added under the the alias "orakey"
It appears that a client based on the JRF WS stack supports retrieving service certificate from WSDL, whereas as client based on WLS WS stack does not!
)


8) Add options to credential store (CWALLET.SSO) so as to access keys/certificates from keystore

%MW_HOME%\oracle_common\common\bin\wlst
connect('weblogic','weblogic1','t3://localhost:7101')
createCred(map="oracle.wsm.security", key="keystore-csf-key", user="n/a", password="welcome1", desc="keystore access password")
createCred(map="oracle.wsm.security", key="sign-csf-key", user="clientkey", password="welcome1", desc="signing key alias and password")
createCred(map="oracle.wsm.security", key="enc-csf-key", user="clientkey", password="welcome1", desc="encryption key alias and password")

Optional:
listCred(map="oracle.wsm.security", key="keystore-csf-key")
listCred(map="oracle.wsm.security", key="sign-csf-key")
listCred(map="oracle.wsm.security", key="enc-csf-key")


Verify cwallet.sso was updated… (note the addition of the oracle.wsm.security Secret Store entries) :-

C:\JDeveloper\system11.1.1.3.37.56.60\DefaultDomain\config\fmwconfig>

c:\Oracle\Middleware\oracle_common\bin\orapki wallet display -wallet cwallet.sso

Oracle PKI Tool : Version 11.1.1.2.0
Copyright (c) 2004, 2009, Oracle and/or its affiliates. All rights reserved.

Requested Certificates:
User Certificates:
Oracle Secret Store entries:
oracle.wsm.security@#3#@enc-csf-key
oracle.wsm.security@#3#@keystore-csf-key
oracle.wsm.security@#3#@sign-csf-key
Trusted Certificates:
Subject:        OU=Class 1 Public Primary Certification Authority,O=VeriSign\, Inc.,C=US
Subject:        OU=Secure Server Certification Authority,O=RSA Data Security\, Inc.,C=US
Subject:        CN=Entrust.net Secure Server Certification Authority,OU=(c) 1999 Entrust.net Limited,OU=www.entrust.net/CPS incorp. by ref. (limits liab.),O=Entrust.net,C=US
Subject:        CN=GTE CyberTrust Global Root,OU=GTE CyberTrust Solutions\, Inc.,O=GTE Corporation,C=US
Subject:        OU=Class 3 Public Primary Certification Authority,O=VeriSign\, Inc.,C=US
Subject:        CN=Entrust.net Secure Server Certification Authority,OU=(c) 2000 Entrust.net Limited,OU=www.entrust.net/SSL_CPS incorp. by ref. (limits liab.),O=Entrust.net
Subject:        OU=Class 2 Public Primary Certification Authority,O=VeriSign\, Inc.,C=US
Subject:        CN=Entrust.net Certification Authority (2048),OU=(c) 1999 Entrust.net Limited,OU=www.entrust.net/CPS_2048 incorp. by ref. (limits liab.),O=Entrust.net

Monday, August 23, 2010

XBMC CrystalHD Update #2 August 2010

To leverage crystalhd kext, library and firmware based on r156 (http://code.google.com/p/crystalhd-for-osx/updates/list), replace Step 2 in the post

http://todayguesswhat.blogspot.com/2010/08/xbmc-crystalhd-updated-instructions.html

with the following:

# Step 2: Obtain the crystalhd kext, driver, and firmware and install in to the appropriate location

# run as root (sudo -s)

cd /tmp

rm -rf crystalhd-for-osx-3.6.0*

wget http://crystalhd-for-osx.googlecode.com/files/crystalhd-for-osx-3.6.0.zip

unzip crystalhd-for-osx-3.6.0.zip crystalhd-for-osx-3.6.0/*

rm -rf /System/Library/Extensions/BroadcomCrystalHD.kext

mv crystalhd-for-osx-3.6.0/BroadcomCrystalHD.kext /System/Library/Extensions

chown -R root:wheel /System/Library/Extensions/BroadcomCrystalHD.kext

chmod -R 755 /System/Library/Extensions/BroadcomCrystalHD.kext

rm -rf /usr/lib/libcrystalhd.dylib

mv crystalhd-for-osx-3.6.0/libcrystalhd.dylib /usr/lib/

chmod 755 /usr/lib/libcrystalhd.dylib
chown root:wheel /usr/lib/libcrystalhd.dylib

rm -rf /usr/lib/bcm7001*fw.bin

mv crystalhd-for-osx-3.6.0/bcm7001*fw.bin /usr/lib/

chmod 644 /usr/lib/bcm7001*fw.bin
chown root:wheel /usr/lib/bcm7001*fw.bin

rm -rf /tmp/crystalhd-for-osx-3.6.0
rm -rf /tmp/crystalhd-for-osx-3.6.0.zip

# reboot

# check that crystalhd driver is loaded :-
kextstat | grep crystalhd

Output :-
   74    0 0x2fff2000 0x18000    0x17000    com.broadcom.crystalhd.driver (3.6.0) <5 4 3 2>

Saturday, August 21, 2010

XBMC CrystalHD Updated Instructions using 2.01 driver – August 2010

There are plenty of simpler ways to install/verify Crystal HD on the Apple TV.   Below steps should work if you like to get your hands dirty :-

(note – cut/paste blocks of colored text as a whole)

# Step 1: SSH in to the apple tv as the user frontrow using your favourite ssh client

# having successfully logged in, switch to the root user
sudo -s

# Note! - you will need to manually supply the ROOT password for the ABOVE command before proceeding ...

# Step 2: Obtain the crystalhd kext, driver, and firmware and install in to the appropriate location

(Note, see the following post for a replacement ‘Step 2’ http://todayguesswhat.blogspot.com/2010/08/xbmc-crystalhd-update-2-august-2010.html if you want to run a newer build based on r156 http://code.google.com/p/crystalhd-for-osx/updates/list)

cd /tmp

rm -rf crystalhd-for-osx-2.0.1*

wget http://crystalhd-for-osx.googlecode.com/files/crystalhd-for-osx-2.0.1.zip

unzip crystalhd-for-osx-2.0.1.zip crystalhd-for-osx-2.0.1/*

rm -rf /System/Library/Extensions/BroadcomCrystalHD.kext

mv crystalhd-for-osx-2.0.1/BroadcomCrystalHD.kext /System/Library/Extensions

chown -R root:wheel /System/Library/Extensions/BroadcomCrystalHD.kext

chmod -R 755 /System/Library/Extensions/BroadcomCrystalHD.kext

rm -rf /usr/lib/libcrystalhd.dylib

mv crystalhd-for-osx-2.0.1/libcrystalhd.dylib /usr/lib/

chmod 755 /usr/lib/libcrystalhd.dylib
chown root:wheel /usr/lib/libcrystalhd.dylib

rm -rf /usr/lib/bcm7001*fw.bin

mv crystalhd-for-osx-2.0.1/bcm7001*fw.bin /usr/lib/

chmod 644 /usr/lib/bcm7001*fw.bin
chown root:wheel /usr/lib/bcm7001*fw.bin

rm -rf /tmp/crystalhd-for-osx-2.0.1
rm -rf /tmp/crystalhd-for-osx-2.0.1.zip

# Step 3: to load kexts, we require Turbo's ATV or Kext enabler ...

# check for presence of /sbin/turbo_atv_enabler.bin or /sbin/turbo_kext_enabler.bin
if [ ! -f /sbin/turbo_kext_enabler.bin ] && [ ! -f /sbin/turbo_atv_enabler.bin ]; then
  wget
http://crystalhd-for-osx.googlecode.com/files/turbo_atv_enabler.bin
  mv turbo_atv_enabler.bin /sbin
  chown root:wheel /sbin/turbo_atv_enabler.bin
  chmod 755 /sbin/turbo_atv_enabler.bin
fi

# Notes crystal_atv_enabler.bin is just a copy of turbo_atv_enabler.bin (they are MD5 equivalent 6a8ec66d5174a4cefacbe12be4b1e079 - 17780 bytes)

# Step 4: Ensure that the crystalhd kext is activated at boot time !!EITHER!! by adding a new startup item under /System/Library/StartupItems or adding an entry to /etc/rc.local ; If you have installed the Crystal HD driver in the past, it is worthwhile having a quick look on disk to see which mechanism is currently being used to load the driver and continue leveraging that approach.

# Use either method 1 or method 2  below ...

# Step 4 - Method 1:
# Rather than put the kextload entry in /etc/rc.local (as in method 2) - below we make use of /System/Library/StartupItems

mkdir -p /System/Library/StartupItems/LoadCrystalHD

# create StartupParameters.plist file
cat > /System/Library/StartupItems/LoadCrystalHD/StartupParameters.plist <<EOF
{
  Description     = "CrystalHD Driver Loader";
  Provides        = ("CrystalHD Driver");
  Uses            = ("Disks");
}
EOF

# create LoadCrystalHD file
cat > /System/Library/StartupItems/LoadCrystalHD/LoadCrystalHD <<EOF
#!/bin/sh
. /etc/rc.common
 
StartService() {
  if [ -f /sbin/turbo_atv_enabler.bin ]; then
    /sbin/turbo_atv_enabler.bin
  else
    /sbin/turbo_kext_enabler.bin
  fi
  /sbin/kextload -v /System/Library/Extensions/BroadcomCrystalHD.kext
}

StopService() {
  return 0
}

RestartService() {
  return 0
}

RunService "\$1"
EOF

# update permissions/ownership
chown -R root:wheel /System/Library/StartupItems/LoadCrystalHD
chmod -R 755 /System/Library/StartupItems/LoadCrystalHD/LoadCrystalHD
chmod -R 644 /System/Library/StartupItems/LoadCrystalHD/StartupParameters.plist

# one can attempt to confirm startupitem script works by typing
# SystemStarter start LoadCrystalHD


# Step 4 - Method 2:
# Rather than add a new startup item to /System/Library/StartupItems (as in method 1) - below we ensure that the crystalhd kext is activated at boot time by adding an entry to /etc/rc.local

# begin rc.local changes ...
touch /etc/rc.local
cp /etc/rc.local /etc/rc.local.original

# check if kext enabler entry missing from rc.local
if [ `grep --count -G '^/sbin/turbo_\(atv\|kext\)_enabler.bin' /etc/rc.local` -eq 0 ]; then
  if [ -f /sbin/turbo_atv_enabler.bin ]; then
    echo "/sbin/turbo_atv_enabler.bin" > /tmp/rc.top
  else
    echo "/sbin/turbo_kext_enabler.bin" > /tmp/rc.top
  fi

  cat /tmp/rc.top /etc/rc.local.original > /etc/rc.local
  rm -rf /tmp/rc.top
fi

# add kexload entry to end of rc.local file if missing
if [ `grep --count -G '^/sbin/kextload -v /System/Library/Extensions/BroadcomCrystalHD.kext' /etc/rc.local` -eq 0 ]; then
  echo "/sbin/kextload -v /System/Library/Extensions/BroadcomCrystalHD.kext" >> /etc/rc.local
fi

# ensure rc.local permissions are correct
chown root:wheel /etc/rc.local
chmod 644 /etc/rc.local


# Step 5: Next, we want to add support from laucher for downloading XBMC nightly builds

# exit as user root, and return as user frontrow ...
exit

# Note! You should now be the user frontrow.

# add xbmc nightly download location entry for launcher if not present ...
defaults read com.teamxbmc.xbmclauncher XBMCAdditionalDownloadPlistURLs 2>/dev/null | grep --silent mirrors.xbmc.org/nightlies/osx/update_urls.plist
if [ $? -eq 1 ]; then
  defaults write com.teamxbmc.xbmclauncher XBMCAdditionalDownloadPlistURLs -array
http://mirrors.xbmc.org/nightlies/osx/update_urls.plist
fi


# Step 6: From the Apple TV User Interface, Go to the launcher menu, then choose "Settings", then choose "Downloads"
# - Obtain the latest xbmc download build available


# Step 7: Reboot the Apple TV ...
sudo -s
reboot

# Step 8: After the Apple TV has rebooted, fire up XBMC from the launcher
# check that XBMC has detected the Crystal HD ...

# Check under "System -> Video -> Playback -> there is an option selected "Allow hardware acceleration (CrystalHD)"

# If no /usr/lib/libcrystalhd.dylib or no BroadcomCrystalHD.kext loaded, then CrystalHD will NOT show up above..

# Optional - Basic debugging can be done in the event the Cyrstal HD was not detected:

# switch to root
sudo -s

# check that crystal hd hardware was detected
dmesg

Output :-
...
BroadcomCrystalHD::start
crystalhd_hw_open: setting up functions, device = Link
Starting Crystal HD Device
Opening HW. hw:0x1f28e04, hw->adp:0x200e300
Stopping Crystal HD Device
BroadcomCrystalHD: Found HW and started driver SW.

# check that crystalhd driver is loaded :-
kextstat | grep crystalhd

Output :-
   74    0 0x30157000 0x18000    0x17000    com.broadcom.crystalhd.driver (3.5.0) <5 4 3 2>


# Check the xbmc.log when playing an appropriate movie ..
grep -i crystal /Users/frontrow/Library/Logs/xbmc.log

10:52:16 T:2684407808 M: 18456576    INFO: CrystalHD(new API): device opened

Tuesday, August 17, 2010

ADF11g Add javascript to jspx / trigger javascript onLoad event

<?xml version='1.0' encoding='UTF-8'?>
<jsp:root xmlns:jsp="http://java.sun.com/JSP/Page" version="2.1"
          xmlns:f="http://java.sun.com/jsf/core"
          xmlns:h="http://java.sun.com/jsf/html"
          xmlns:af="http://xmlns.oracle.com/adf/faces/rich">
  <jsp:directive.page contentType="text/html;charset=UTF-8"/>
  <f:view>
    <af:document id="d1">
      <f:facet name="metaContainer">
        <af:group id="g1">
          <af:resource type="javascript">
            function someFunction()
            {
              alert('hello');
            }
          </af:resource>
          <af:resource type="javascript" source="xxx.js"/>
        </af:group>
      </f:facet>
      <af:clientListener method="someFunction" type="load"/>
      <af:form id="f1"> …
      </af:form>
    </af:document>
  </f:view>
</jsp:root>

Thursday, July 22, 2010

How to query and obtain MD5 checksum for a file hosted on rapidshare.com

How many times have you downloaded file(s) from rapidshare.com only to extract them / join them / etc and discover that the file appears to be corrupted? You then wonder was it a download issue, or was the actual file itself hosted on rapidshare the problem.

My ADSL2+ internet connection here in Australia is slow by today’s internet speed standards (realworld tests, I get 500 KB/s download and 100 KB/s upload); To add insult to injury, internet quota in Australia is capped!  Thus, I don’t want to have to download a large file again, unless absolutely required.

The solution to this problem, is to make a basic HTTP request to rapidshare and request MD5 checksum information for the specific file(s) concerned, and then compare this with the MD5 checksums of the downloaded files on your local machine.

To perform MD5 checksum on your local files, first get yourself a suitable md5 hash tool for your specific OS platform concerned:

http://www.openoffice.org/dev_docs/using_md5sums.html

You can then use my html script below to query rapidshare for checksum info.  Put in the textarea the rapidshare links to query, for example

 http://rapidshare.com/files/408093110/test.iso

The MD5 checksum is returned as 32-character, hexadecimal-formatted hash. Using the test.iso link above for example, the MD5 checksum component returned by rapidshare appears in bold below:

408093110,test.iso,20348928,153,1,l3,78F8244AF76C6CF9641190780A50A9D8

<html>
  <body>
    <!-- Code by M.Shannon -->

    <script type="text/javascript">

      var debugMode=false; // set to true to enable window alerts

      function findURLs(refFiles, refFileNames)
      {
        var exp=/http:\/\/(www\.)?rapidshare\.com\/files\/\d+\/[\w_\-\.]+/igm;
        var matches = document.getElementById("urls").value.match(exp);

        if (matches != null)
        {
          for (var i = 0; i < matches.length; i++)
          {
            var url = matches[i];
            if (debugMode) { alert(url); }
            var index1 = url.lastIndexOf("/files/");
            var index2 = url.lastIndexOf("/");

            refFiles.push(url.substring(index1 + 7, index2));
            refFileNames.push(url.substring(index2 + 1));
          }
        }
      }

      function validate(form)
      {
        var files = new Array();
        var fileNames = new Array();

        findURLs(files, fileNames);

        if (files.length > 0)
        {
          if (debugMode) { alert(files); alert(fileNames); }
          form.files.value = files.toString();
          form.filenames.value = fileNames.toString();
          return true;
        }
       
        return false;
      }

  </script>

  <form><textarea id="urls" cols="80" rows="4">paste your rapidshare hyperlinks in to this textarea</textarea></form>

  <form method="post" action="http://api.rapidshare.com/cgi-bin/rsapi.cgi" onsubmit="return validate(this);">
    <input name="sub" type="hidden" value="checkfiles_v1">
    <input name="incmd5" type="hidden" value="1">
    <input name="files" type="hidden" value="">
    <input name="filenames" type="hidden" value="">
    <input type="submit">
  </form>

  <script type="text/javascript">
    document.getElementById("urls").focus();
  </script>

  </body>
</html>

Wednesday, July 21, 2010

How to prevent auto-repeat of videos in XBMC

For the best part of the last year, one annoying issue I have found with my particular XBMC setup was that videos would auto-repeat. I could not understand why this was, or where the auto-repeat setting was stored. If you pressed the TV power button mid playback of a movie, the movie would continue to play and repeat over and over.

It was particularly nasty should the video be played from an external USB disk, as the disk would never go to sleep.

Anyway, today I finally worked out where this setting is stored; instructions below assume an AppleTV XBMC setup :-

Navigate to a movie/tv episode etc

Hold down menu button until popup menu appears

from popup menu, choose "Queue item"

hold down menu button once more until popup menu re-appears

from popup menu, choose "Now playing ..."

"NOW PLAYING - VIDEOS" screen should appear

press Previous/Rewind button, and a side-menu on left-hand side should appear

Check the value for the REPEAT option. If it is set to REPEAT:ALL, movie will play over and over.

Set it to REPEAT:OFF

Friday, July 9, 2010

How to determine ATV Software Version Running

-bash-2.05b$ sw_vers
ProductName:    Apple TV OS
ProductVersion: 10.4.7
BuildVersion:   8N5880

AKA – Software Version 2.40

According to XBMC God – S.Davilla:

r1.00 -> 8N5107
r1.10 -> 8N5239
r2.00 -> 8N5400
r2.01 -> 8N5455
r2.02 -> 8N5461
r2.10 -> 8N5519
r2.20 -> 8N5622
r2.30 -> 8N5722

View ORACLE SQL query results with columns rendered vertically

Below is a script I hacked together from various sources to render ORACLE SQL query results in a vertical fashion (column are presented vertically rather than horizontally).

Tested with Oracle Database 11g Enterprise 11.2.0.1.0

:-

REM NAME: vselect.sql - Replacement by M Shannon.
prompt
accept tname prompt "Enter the table or view you wish to display vertically: "
prompt
prompt Enter the "WHERE" clause(s)...
prompt - if there is no "WHERE" clause, press [Enter].
prompt - do not include the word, "WHERE"; just specify syntax beyond "WHERE".
prompt - do not use single quotes for literals; use double quotes (") to enclose literals.
prompt
accept where prompt '=> '
prompt
prompt Enter the "ORDER BY" clause...
prompt - if there is no "ORDER BY" clause, press [Enter].
prompt - do not include the words, "ORDER BY"; just specify syntax beyond "ORDER BY"
prompt - do not use single quotes for literals; use double quotes (") to enclose literals.
prompt
accept orderby prompt '=> '
prompt

set termout on
set serveroutput on

declare
  l_where_clause    varchar2(500);
  l_orderby_clause  varchar2(500);
  l_cur             number;
  l_dtbl            dbms_sql.desc_tab;
  l_cnt             number;
  l_status          number;
  l_val             varchar2(200);
  double_quote      char(1) := '"';
  two_single_quotes char(1) := chr(39);
begin
  if length('&where') > 0 then
    l_where_clause := 'WHERE ' || replace(ltrim(rtrim('&where')),double_quote,two_single_quotes);
  else
    l_where_clause := null;
  end if;

  if length('&orderby') > 0 then
    l_orderby_clause := 'ORDER BY '|| replace(ltrim(rtrim('&orderby')),double_quote,two_single_quotes);
  else
    l_orderby_clause    := null;
  end if;

  l_cur := dbms_sql.open_cursor;
  dbms_sql.parse(l_cur,'select * from &tname '|| l_where_clause ||' '|| l_orderby_clause,dbms_sql.native);
  dbms_sql.describe_columns(l_cur,l_cnt,l_dtbl);
  for i in 1..l_cnt loop
    dbms_sql.define_column(l_cur,i,l_val,30);
  end loop;

  l_status := dbms_sql.execute(l_cur);

  while ( dbms_sql.fetch_rows(l_cur) > 0 ) loop
    dbms_output.put_line(lpad('=',80,'='));
    for i in 1..l_cnt loop
      dbms_sql.column_value(l_cur,i,l_val);
      dbms_output.put_line(rpad(l_dtbl(i).col_name,30) ||' --> '||l_val);
    end loop;
  end loop;
  dbms_sql.close_cursor(l_cur);
end;
/

Sample output:

SQL> @ /home/mshannon/other/scripts/database/vselect

Enter the table or view you wish to display vertically: dba_users

Enter the "WHERE" clause(s)...
- if there is no "WHERE" clause, press [Enter].
- do not include the word, "WHERE"; just specify syntax beyond "WHERE".
- do not use single quotes for literals; use double quotes (") to enclose literals.

=> username like "SY%"

Enter the "ORDER BY" clause...
- if there is no "ORDER BY" clause, press [Enter].
- do not include the words, "ORDER BY"; just specify syntax beyond "ORDER BY"
- do not use single quotes for literals; use double quotes (") to enclose literals.

=> username asc

...

================================================================================
USERNAME                       --> SYS
USER_ID                        --> 0
PASSWORD                       -->
ACCOUNT_STATUS                 --> OPEN
LOCK_DATE                      -->
EXPIRY_DATE                    --> 24-AUG-10
DEFAULT_TABLESPACE             --> SYSTEM
TEMPORARY_TABLESPACE           --> TEMP
CREATED                        --> 13-AUG-09
PROFILE                        --> DEFAULT
INITIAL_RSRC_CONSUMER_GROUP    --> SYS_GROUP
EXTERNAL_NAME                  -->
PASSWORD_VERSIONS              --> 10G 11G
EDITIONS_ENABLED               --> N
AUTHENTICATION_TYPE            --> PASSWORD
================================================================================
USERNAME                       --> SYSMAN
USER_ID                        --> 72
PASSWORD                       -->
ACCOUNT_STATUS                 --> OPEN
LOCK_DATE                      -->
EXPIRY_DATE                    --> 24-AUG-10
DEFAULT_TABLESPACE             --> SYSAUX
TEMPORARY_TABLESPACE           --> TEMP
CREATED                        --> 13-AUG-09
PROFILE                        --> DEFAULT
INITIAL_RSRC_CONSUMER_GROUP    --> DEFAULT_CONSUMER_GROUP
EXTERNAL_NAME                  -->
PASSWORD_VERSIONS              --> 10G 11G
EDITIONS_ENABLED               --> N
AUTHENTICATION_TYPE            --> PASSWORD
================================================================================
USERNAME                       --> SYSTEM
USER_ID                        --> 5
PASSWORD                       -->
ACCOUNT_STATUS                 --> OPEN
LOCK_DATE                      -->
EXPIRY_DATE                    --> 24-AUG-10
DEFAULT_TABLESPACE             --> SYSTEM
TEMPORARY_TABLESPACE           --> TEMP
CREATED                        --> 13-AUG-09
PROFILE                        --> DEFAULT
INITIAL_RSRC_CONSUMER_GROUP    --> SYS_GROUP
EXTERNAL_NAME                  -->
PASSWORD_VERSIONS              --> 10G 11G
EDITIONS_ENABLED               --> N
AUTHENTICATION_TYPE            --> PASSWORD

PL/SQL procedure successfully completed.